Synology DiskStation DS1621+ Review
I decided to upgrade my slightly more than three years old 4-bay Synology DiskStation DS918+ to the 6-bay Synology DiskStation DS1621+.
Back in 2017, DS918+ was the flagship Synology 4-bay NAS and that was replaced with DS920+ in 2020. Also in 2020, the 5-bay DS1520+ got updated.
It is now 2021, and late last year Synology updated the 6-bay DS1621+ (from DS1618+) and the 8-bay DS1821+ (from DS1819+).
The DS1621+ retails for S$1,244 and you can find them with official Synology retailers like Storage Studios on Lazada.
DiskStation Plus Series
For Synology DiskStation in their Plus Series, there are two 2-bay NAS, two 4-bay NAS, one 5-bay NAS, two 6-bay NAS, one 8-bay NAS, and one 12-bay NAS.

DS220+ and DS720+ are both 2-bay, where the DS720+ is the higher-end 2-bay NAS.
DS4220+ and DS920+ are both 4-bay, where DS920+ is the higher-end 4-bay NAS.
DS1520+ is a 5-bay NAS.
DS620slim and DS1621+ are both 6-bay, where DS1621+ is the higher-end 6-bay NAS.
DS1821+ is an 8-bay NAS, while DS2419+ is a 12-bay NAS.
Sometimes the last two digits of the model name represent the year it is targetted for rather than the year it is released. For example, DS1821+ is meant for 2021, but it is released in late 2020. However, DS920+ is meant for 2020 and is released in 2020.
Features
For DS1621+, instead of opting with an Intel processor, Synology decided to go with AMD. DS1621+ is powered with AMD Ryzen V1500B 64-bit processor operating at 2.2 GHz with four cores.
RAM wise, it comes preinstalled with a 4GB DDR4 ECC stick. You can swap it out and increase it to a maximum of 32GB (2x 16GB). Though at that price, I wish Synology would use an 8GB stick instead.
The line that Synology draws between normal consumers and prosumers seems to be at 6-bay since it requires ECC ram from 6-bay and above. ECC ram is slightly harder to get and much more expensive.
ECC stands for Error Correction Code and it is defined on Wikipedia as:
Error correction code memory (ECC memory) is a type of computer data storage that uses an error correction code (ECC) to detect and correct n-bit data corruption which occurs in memory. ECC memory is used in most computers where data corruption cannot be tolerated under any circumstances, like industrial control applications, critical databases, and infrastructural memory caches.
Unboxing

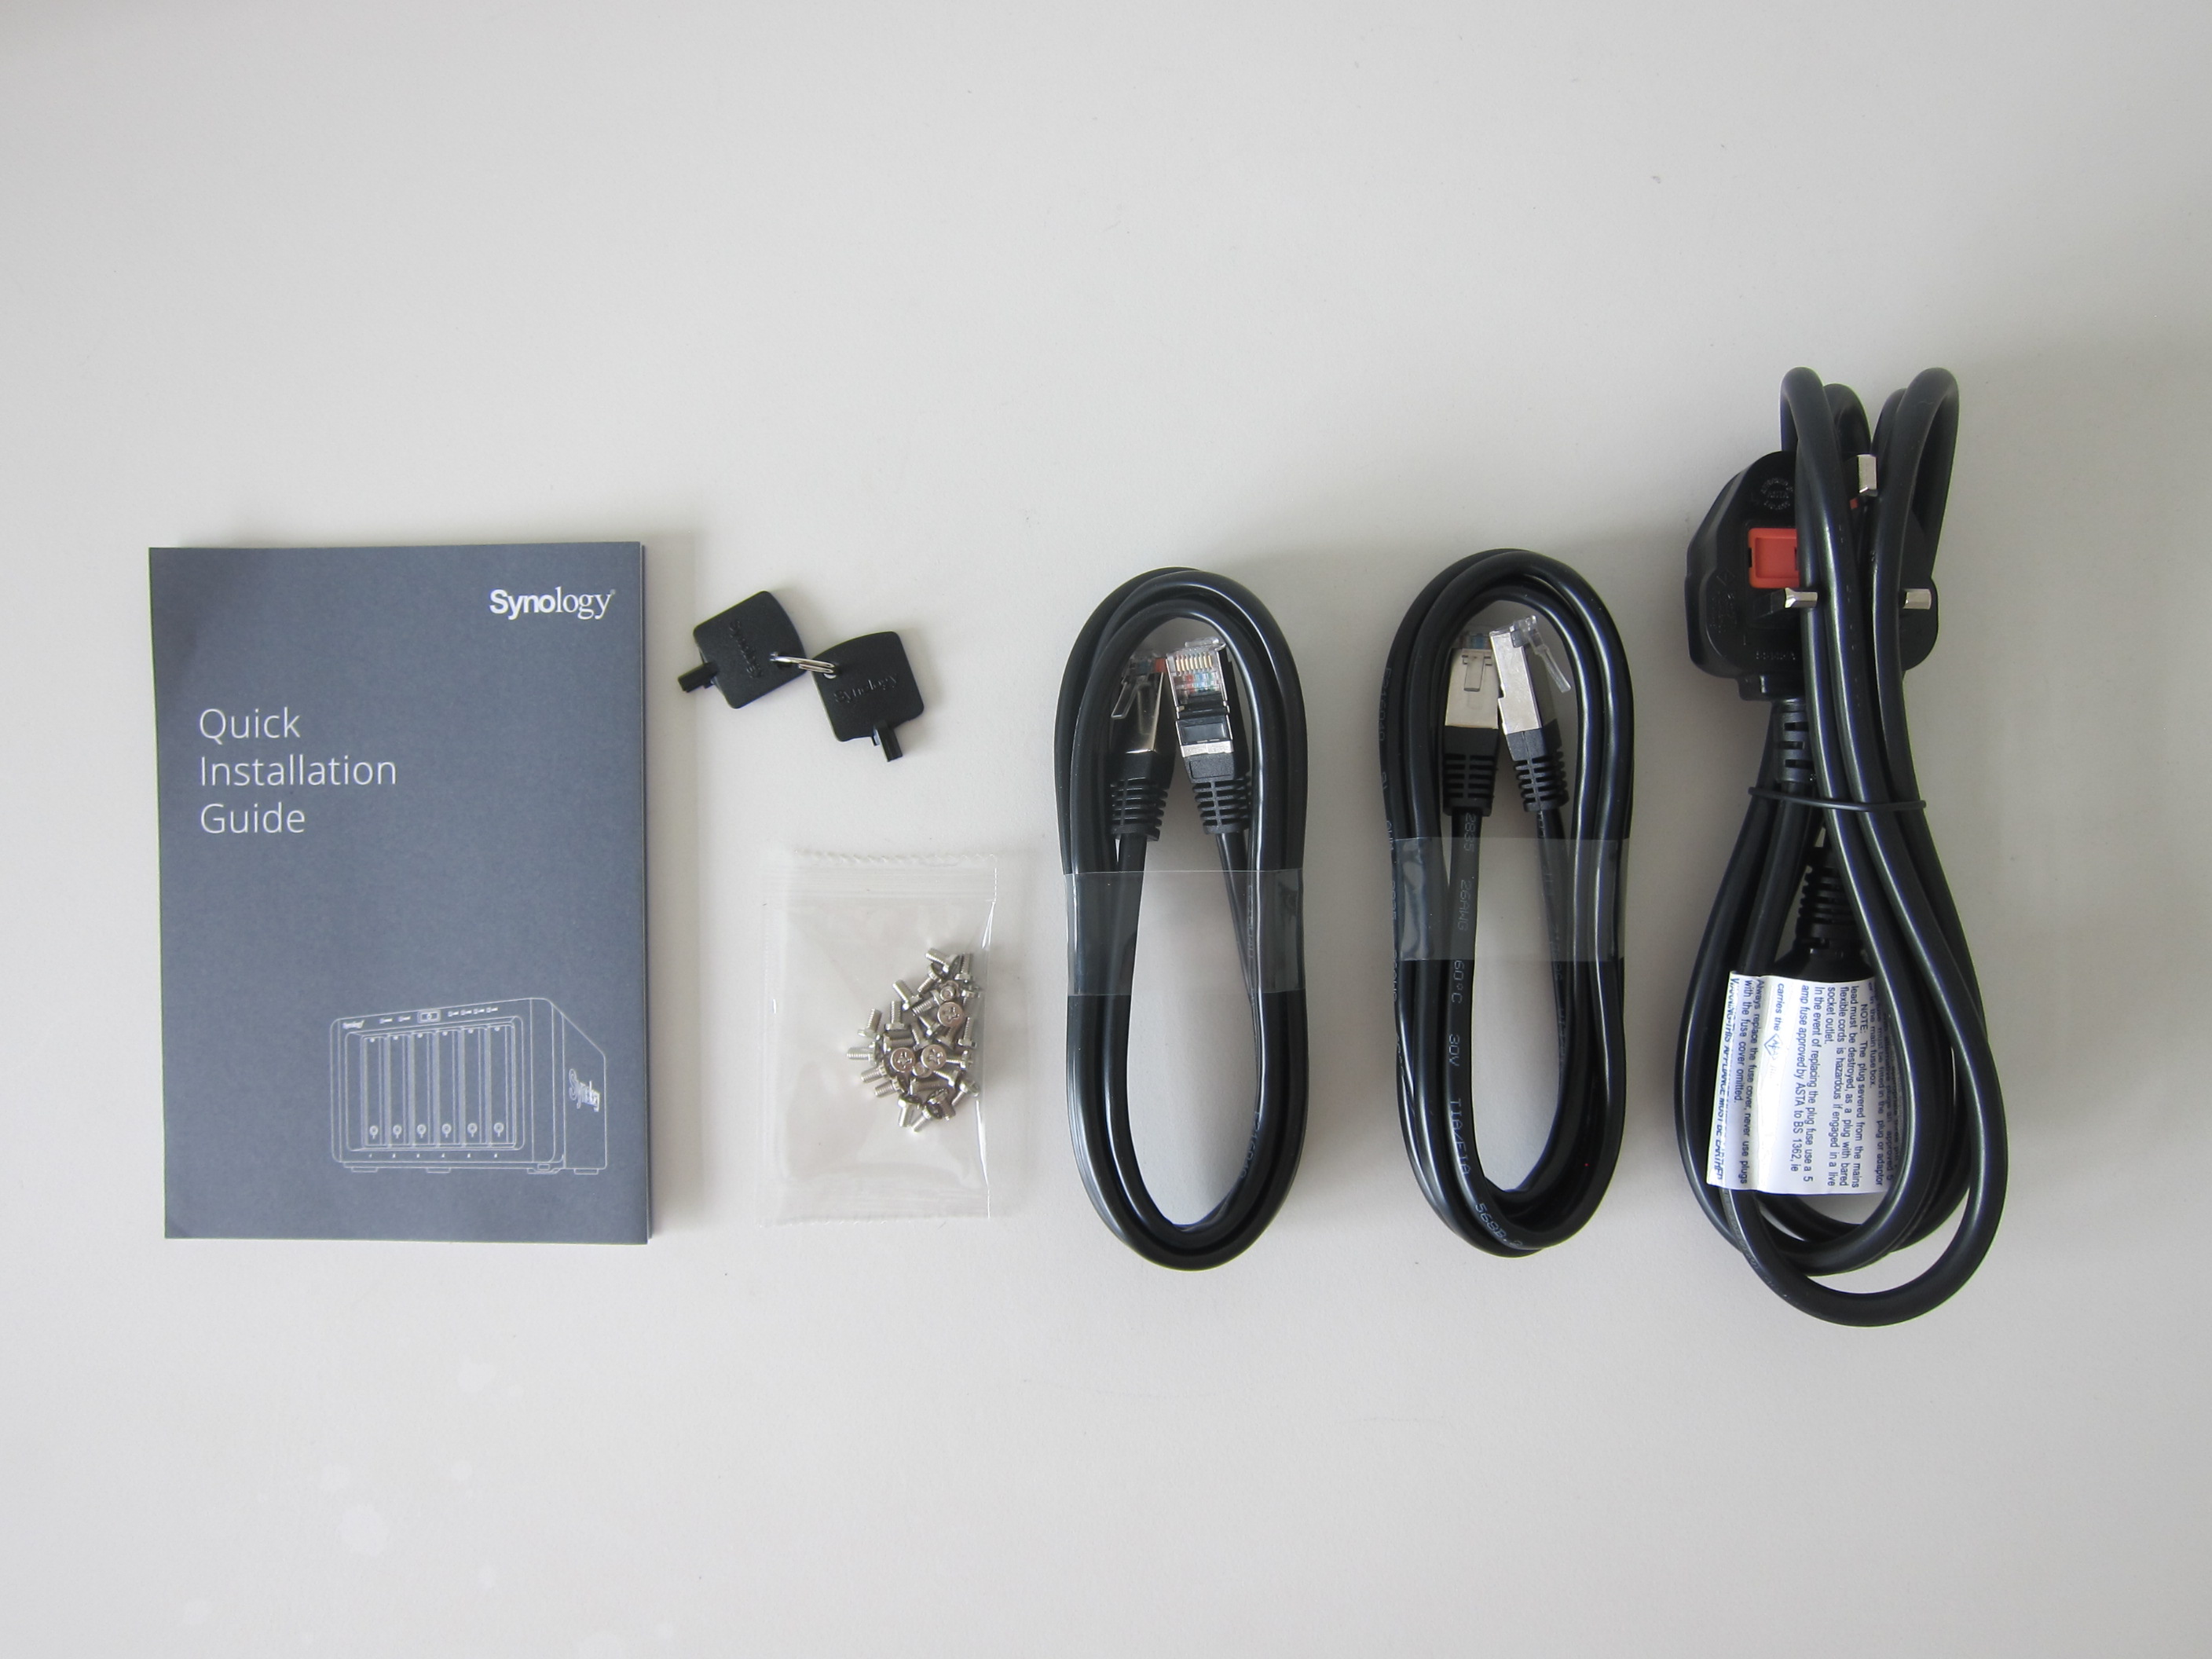
- 1x AC Power Cord
- 2x Drive Bay Key
- 1x Packing of Mounting Screws
- 2x RJ-45 Cat5e LAN Cable
- 1x Quick Installation Guide
As much as I want manufacturers to include Cat6 LAN cables instead of Cat 5e, it will not make a difference if the Ethernet port is still on 1Gbps.
Interestingly, the two LAN cable that is included felt premium because of the metal head. Normally, the whole head will be in plastic.
Not really a nitpick, but if the DS1621+ comes with Gigabit Ethernet ports, maybe it should include four LAN cables?
Design
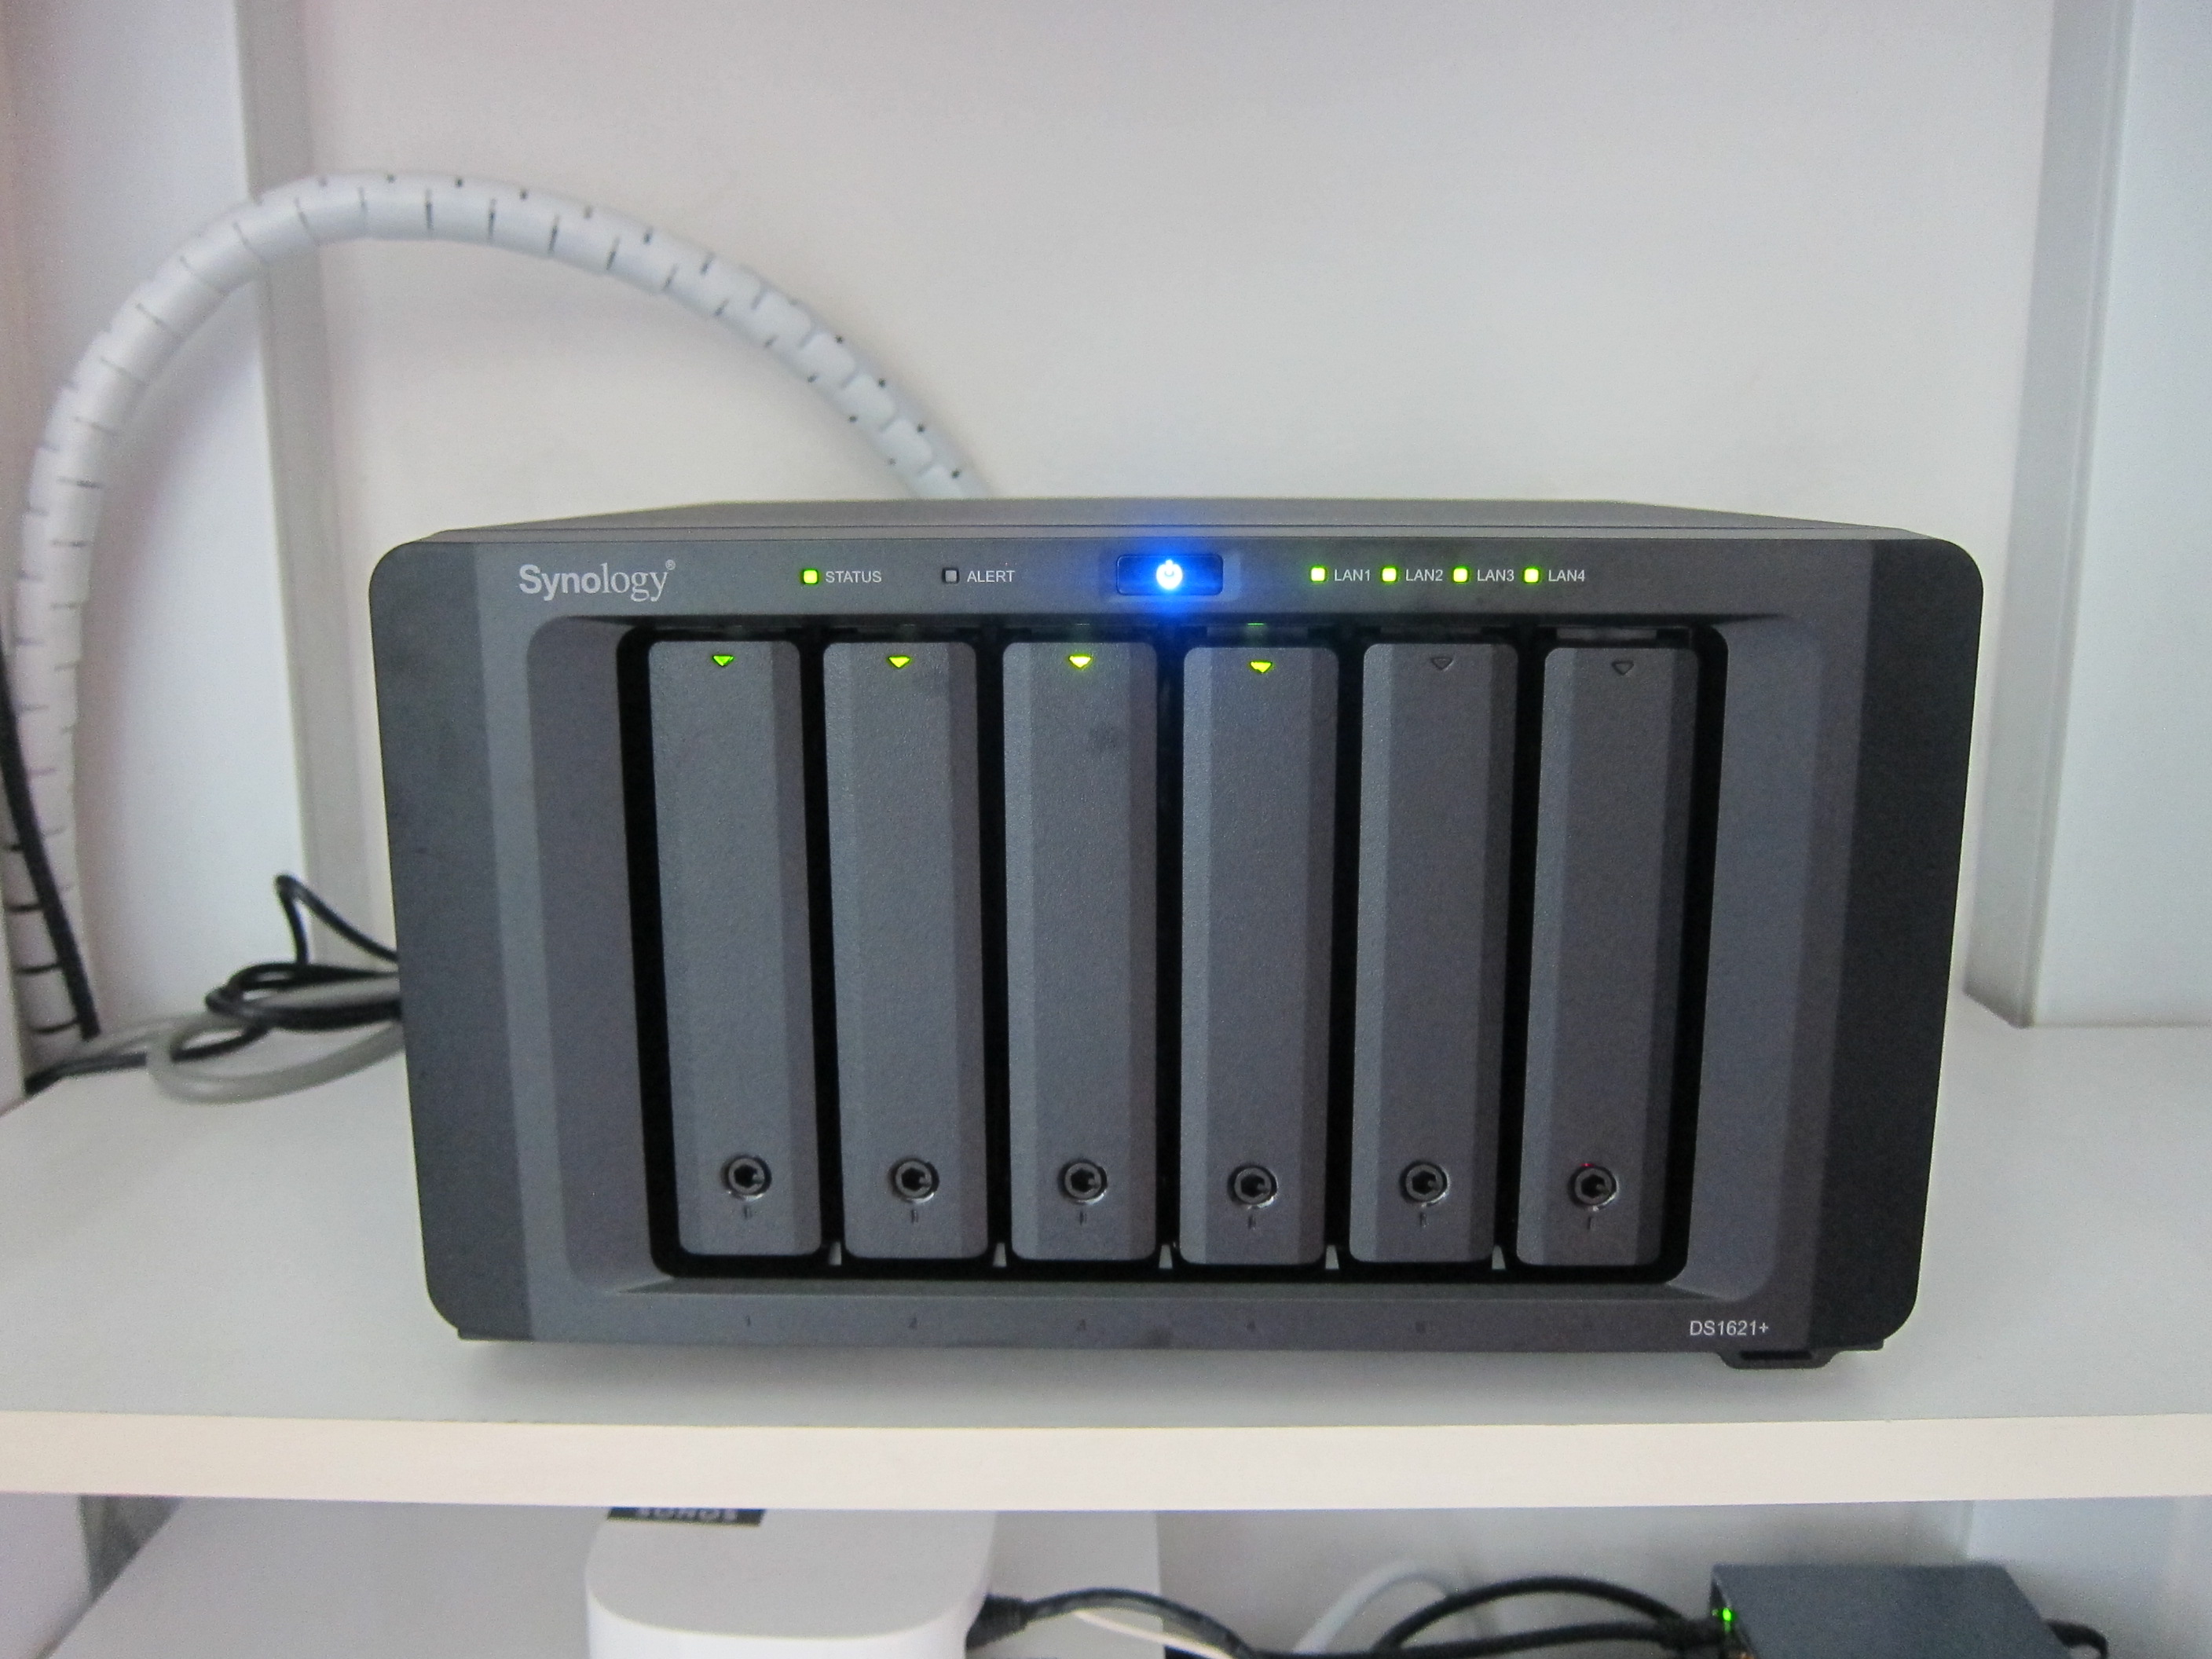
Like most of the NAS from Synology Plus Series, the design is all in matte black.
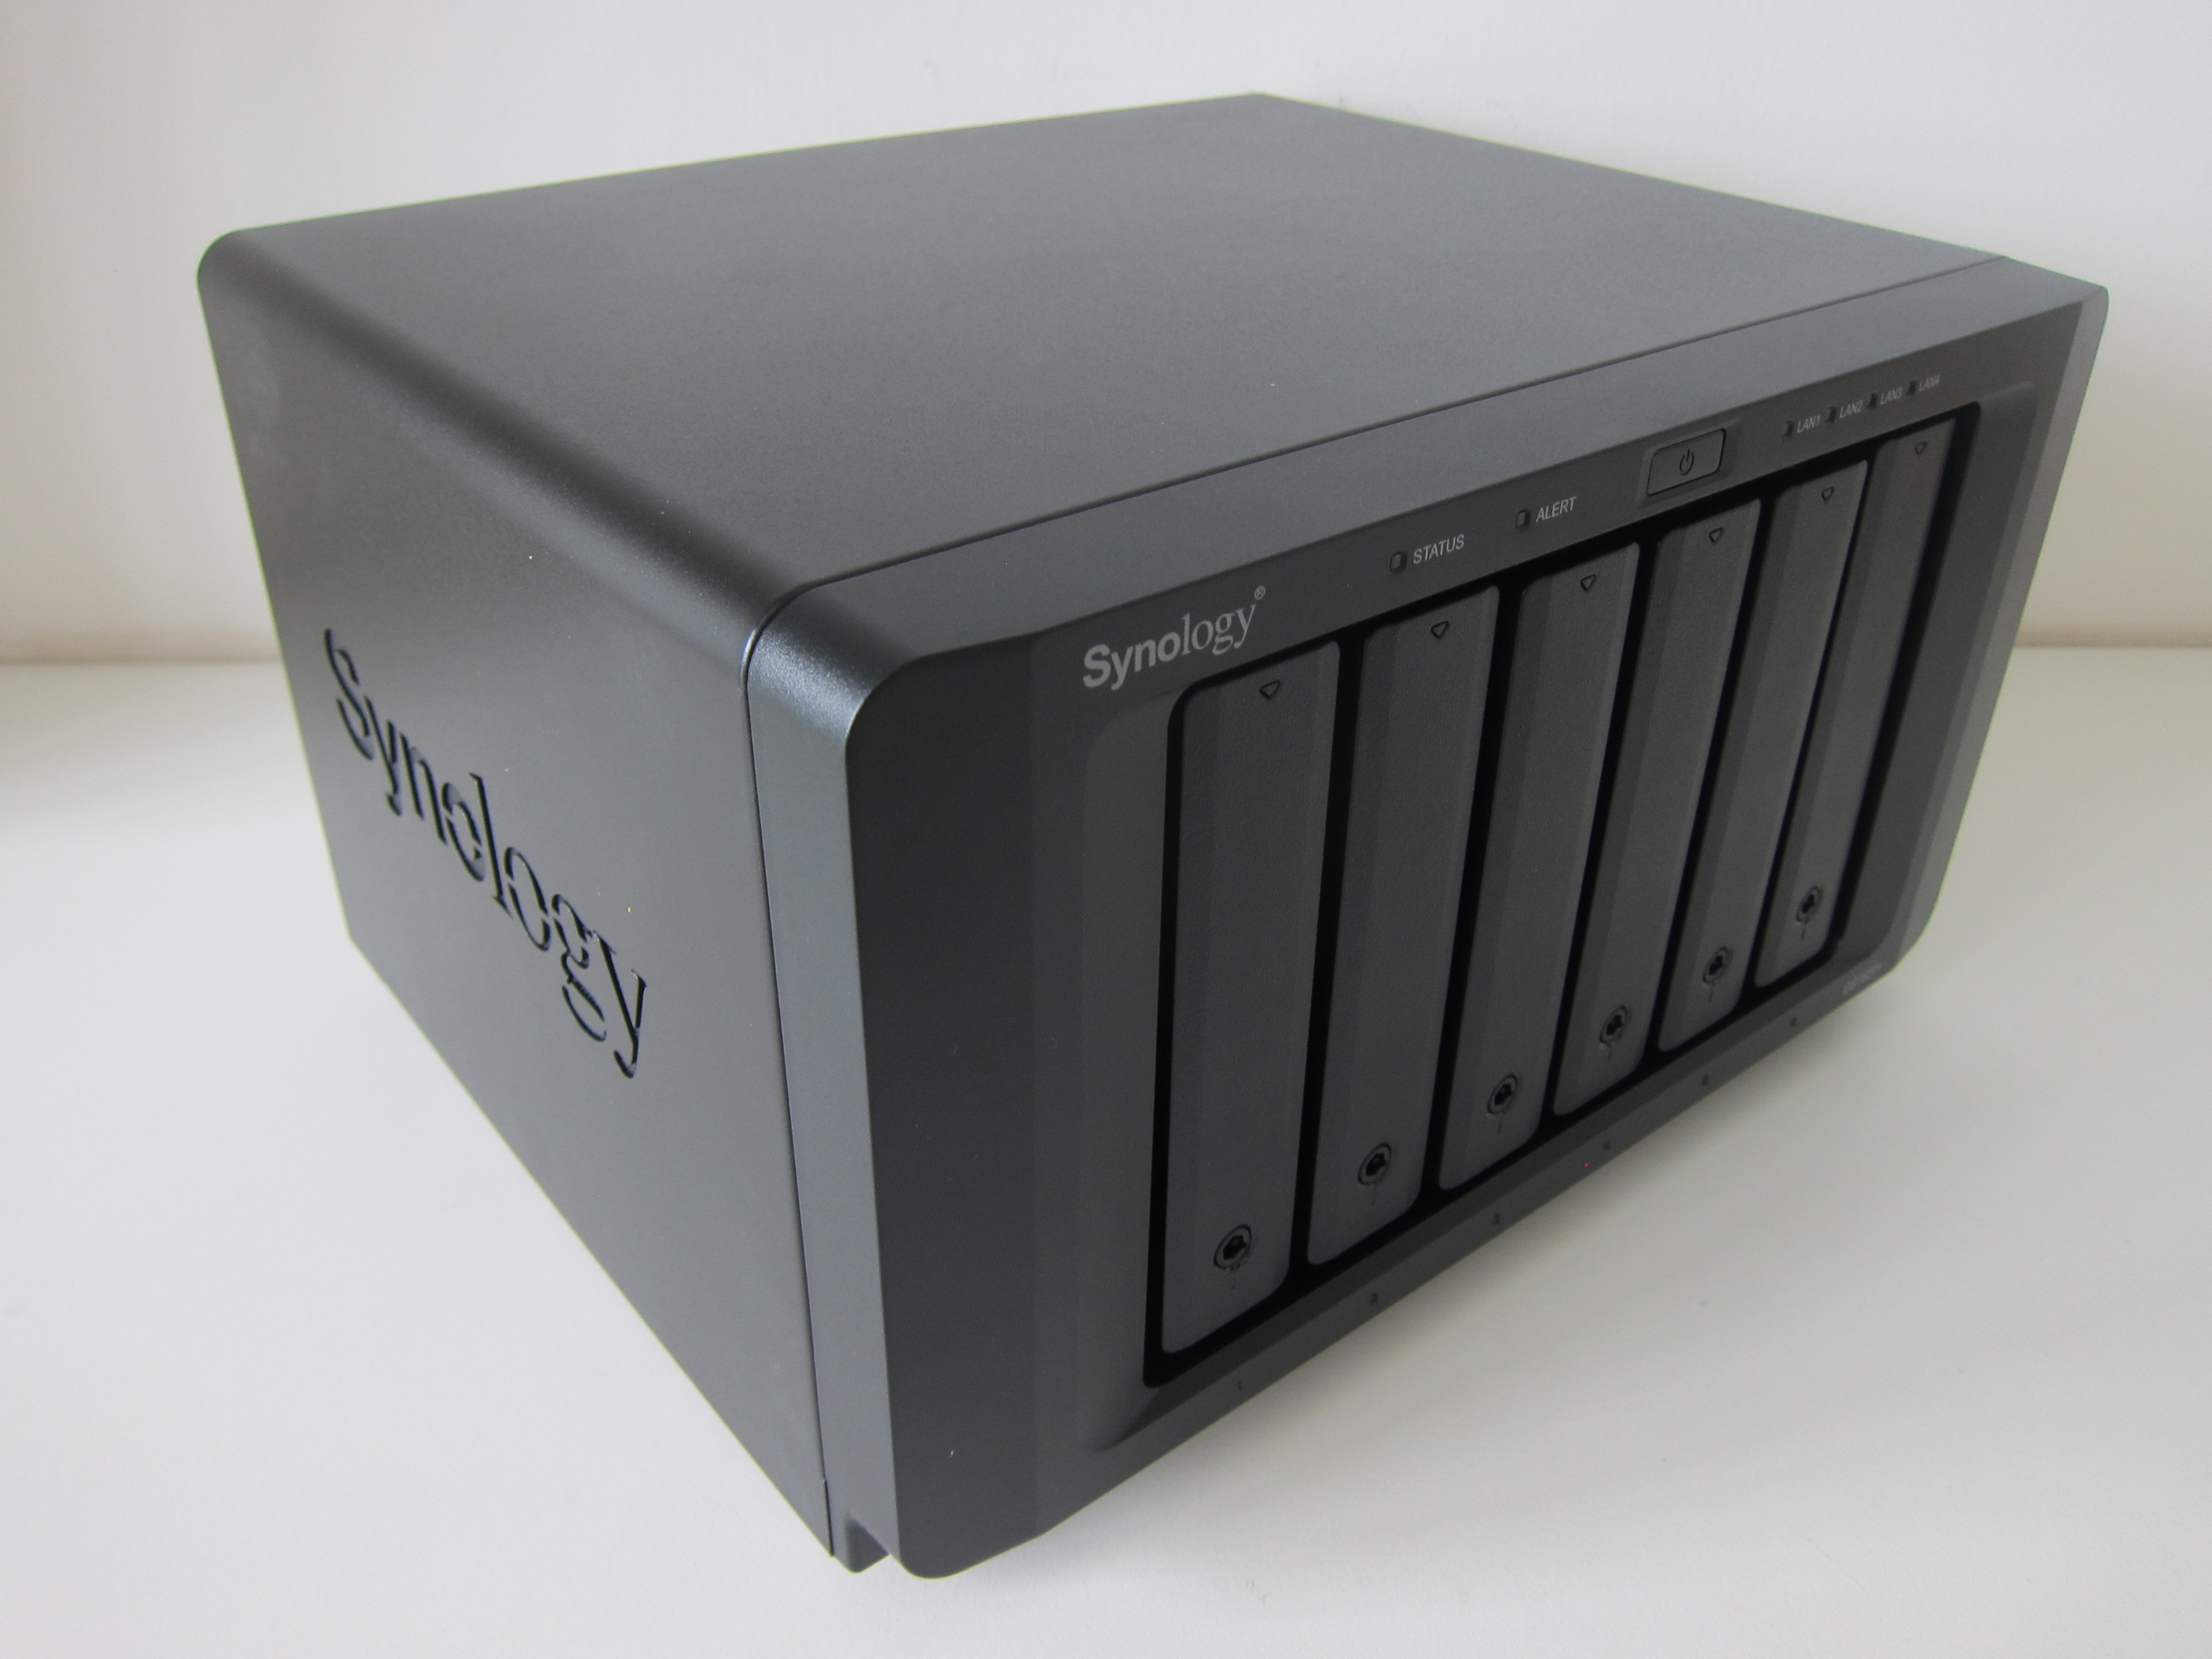

The power button and indicators have been moved to the top of the NAS instead of the side since 6-bays occupy more horizontal space.

DS1621+ comes with an additional indicator which is Alert, and when it blinks orange, you know you have a serious issue with your system like overheating due to the fan not spinning, etc.
Since there are four LAN ports, the four LAN port indicators are now at the top as well, and the hard drive indicators are moved to the respective drives.

Ports/Slots
Like most NAS in the Plus Series, there is only one port in front of the NAS, the USB 3.2 Gen 1 port.
Interestingly, the two 92 mm x 92 mm fans found on the DS1621+ are the same on DS918+/DS920+.

There are four Gigabit Ethernet ports (with Link Aggregation and Failover support), two eSATA ports, and two USB 3.2 Gen 1 ports.

Using the two eSATA ports, and together with the Synology Expansion Unit DX517, you can attach ten more bays to your DS1621+.
Since DS1621+ targets prosumers, most people complain that Synology is still not equipping their NAS with 2.5GbE Ethernet ports. I have no issues with this since my house network is still on 1GbE. Personally, I would love to see at least one USB-A port being replaced by USB-C.
For the DS1621+, you will need to use a screwdriver to remove the bottom panel to access the RAM slot. Previously for DS918+/DS920, the RAM slots are visible once you remove all the drive bays, and hence you do not need to use any tools for it.


Instead, for the DS1621+, once you remove all the drive bays, you will only see two M.2 2280 slots for NVMe caching. You can read more about it on my DS918+ review.


DS1621+ has a PCIe expansion slot. With the PCIe expansion slot, you can add accessories like M.2 SSD adapter and Network Interface Card (NIC) supporting up to 10GbE. Check out the various options on Synology Add-in Cards.
To access the PCIe slot, you will need to remove all the six screws at the back, securing the NAS’s cover.


You will also need to remove the PCIe slot cover at the back, secured by a screw.

Power/Noise
Naturally, with a 6-bay NAS, it consumes about 1.5 times more power than the 4-bay one. The power adapter included is rated 250W as compared to 100W for a normal NAS. Based on Synology, the power consumption for DS918+/DS920+ is 32.17 W (Access) / 9.69 W (HDD Hibernation), while on the DS1621+, it is 51.22 W (Access) / 25.27 W (HDD Hibernation).

One thing I like about the DS1621+ is the built-in power supply, and hence there is no need for a power brick.

With a more powerful processor and more hard drives spinning, the noise level also increases with the number of bays. Synology indicated that on DS918+/DS920+, the noise level is at 19.8 dBA compared to 25.2 dBA on the DS1621+.
Processor
DS1621+ marks the first time Synology went with AMD instead of Intel for their processor on their NAS. It looks like the trend of moving away from Intel has started in the NAS industry, with Synology leading the way. These days, PCs and laptops are all moving towards AMD. Intel has been comfortable for too long that they are not innovating enough compared to their competition. I wonder would they end up being a Nokia.
Based on Geekbench, AMD Ryzen V1500 in DS1621+ obtain a single-core of 590 and a multi-core score of 2,400.

The single-core score is 20% faster, while the multi-core score is 50% faster than that of the Intel Celeron J4125 found in DS920+ in which it has a single-core score of 471 and a multi-core score of 1,524.

For the Intel Celeron J3455 found in DS918+, it has a single-core score of 328 and a multi-score of 1,108. This makes the DS1621+ 80% faster on single-core and two times faster on multi-core than DS918+.

While AMD beats Intel in speed, it loses on the graphics. AMD Ryzen V1500 doesn’t include any processor graphics, while both Intel Celeron J3455 and Intel Celeron J4125 have Intel HD Graphics included. So the DS1621+ is not meant to be used primarily as a media server if you do transcoding. DS1621+ will still work fine for direct streaming.
I used DS918+ as a mini-computer that backups my stuff, run Docker Containers and Virtual Machines. So the DS1621+ is a good candidate to replace it, while my DS920+ acts as my Plex primary media streaming server.
DSM
The strongest advantage of using Synology NAS is its operating system, and in this case, it is the DiskStation Manager (DSM). It comes with DSM 6.2 out of the box, and DSM 7.0 is slated to be released this year.
I will not cover DSM as I have covered it many times in my Synology posts.
Migration
If you are using an existing Synology NAS, you can migrate to a new Synology NAS without any data loss. Migration from a 4-bay Synology NAS to a 6-bay Synology NAS is the same as migrating from a 4-bay Synology NAS to another 4-bay Synology NAS.
You remove the drives from your old Synology NAS and insert them into your new Synology NAS in the same order.
Next, just proceed to find.synology.com and follow the on-screen instructions and you are good to go.


For more details, you can checkout my post on Migrating From Existing Synology DiskStation to Synology DiskStation DS920+.
Setup
This time around, I chose a fresh setup as I have been migrating from many Synology NAS over the years. So I wanted to have a fresh start.
Fresh installation pretty much the same as migrating.
Head to find.synology.com and it should be able to detect your NAS.


It will prompt you to download and install DiskStation Manager (DSM), followed by a NAS reboot after detecting your NAS. This process takes about six minutes.
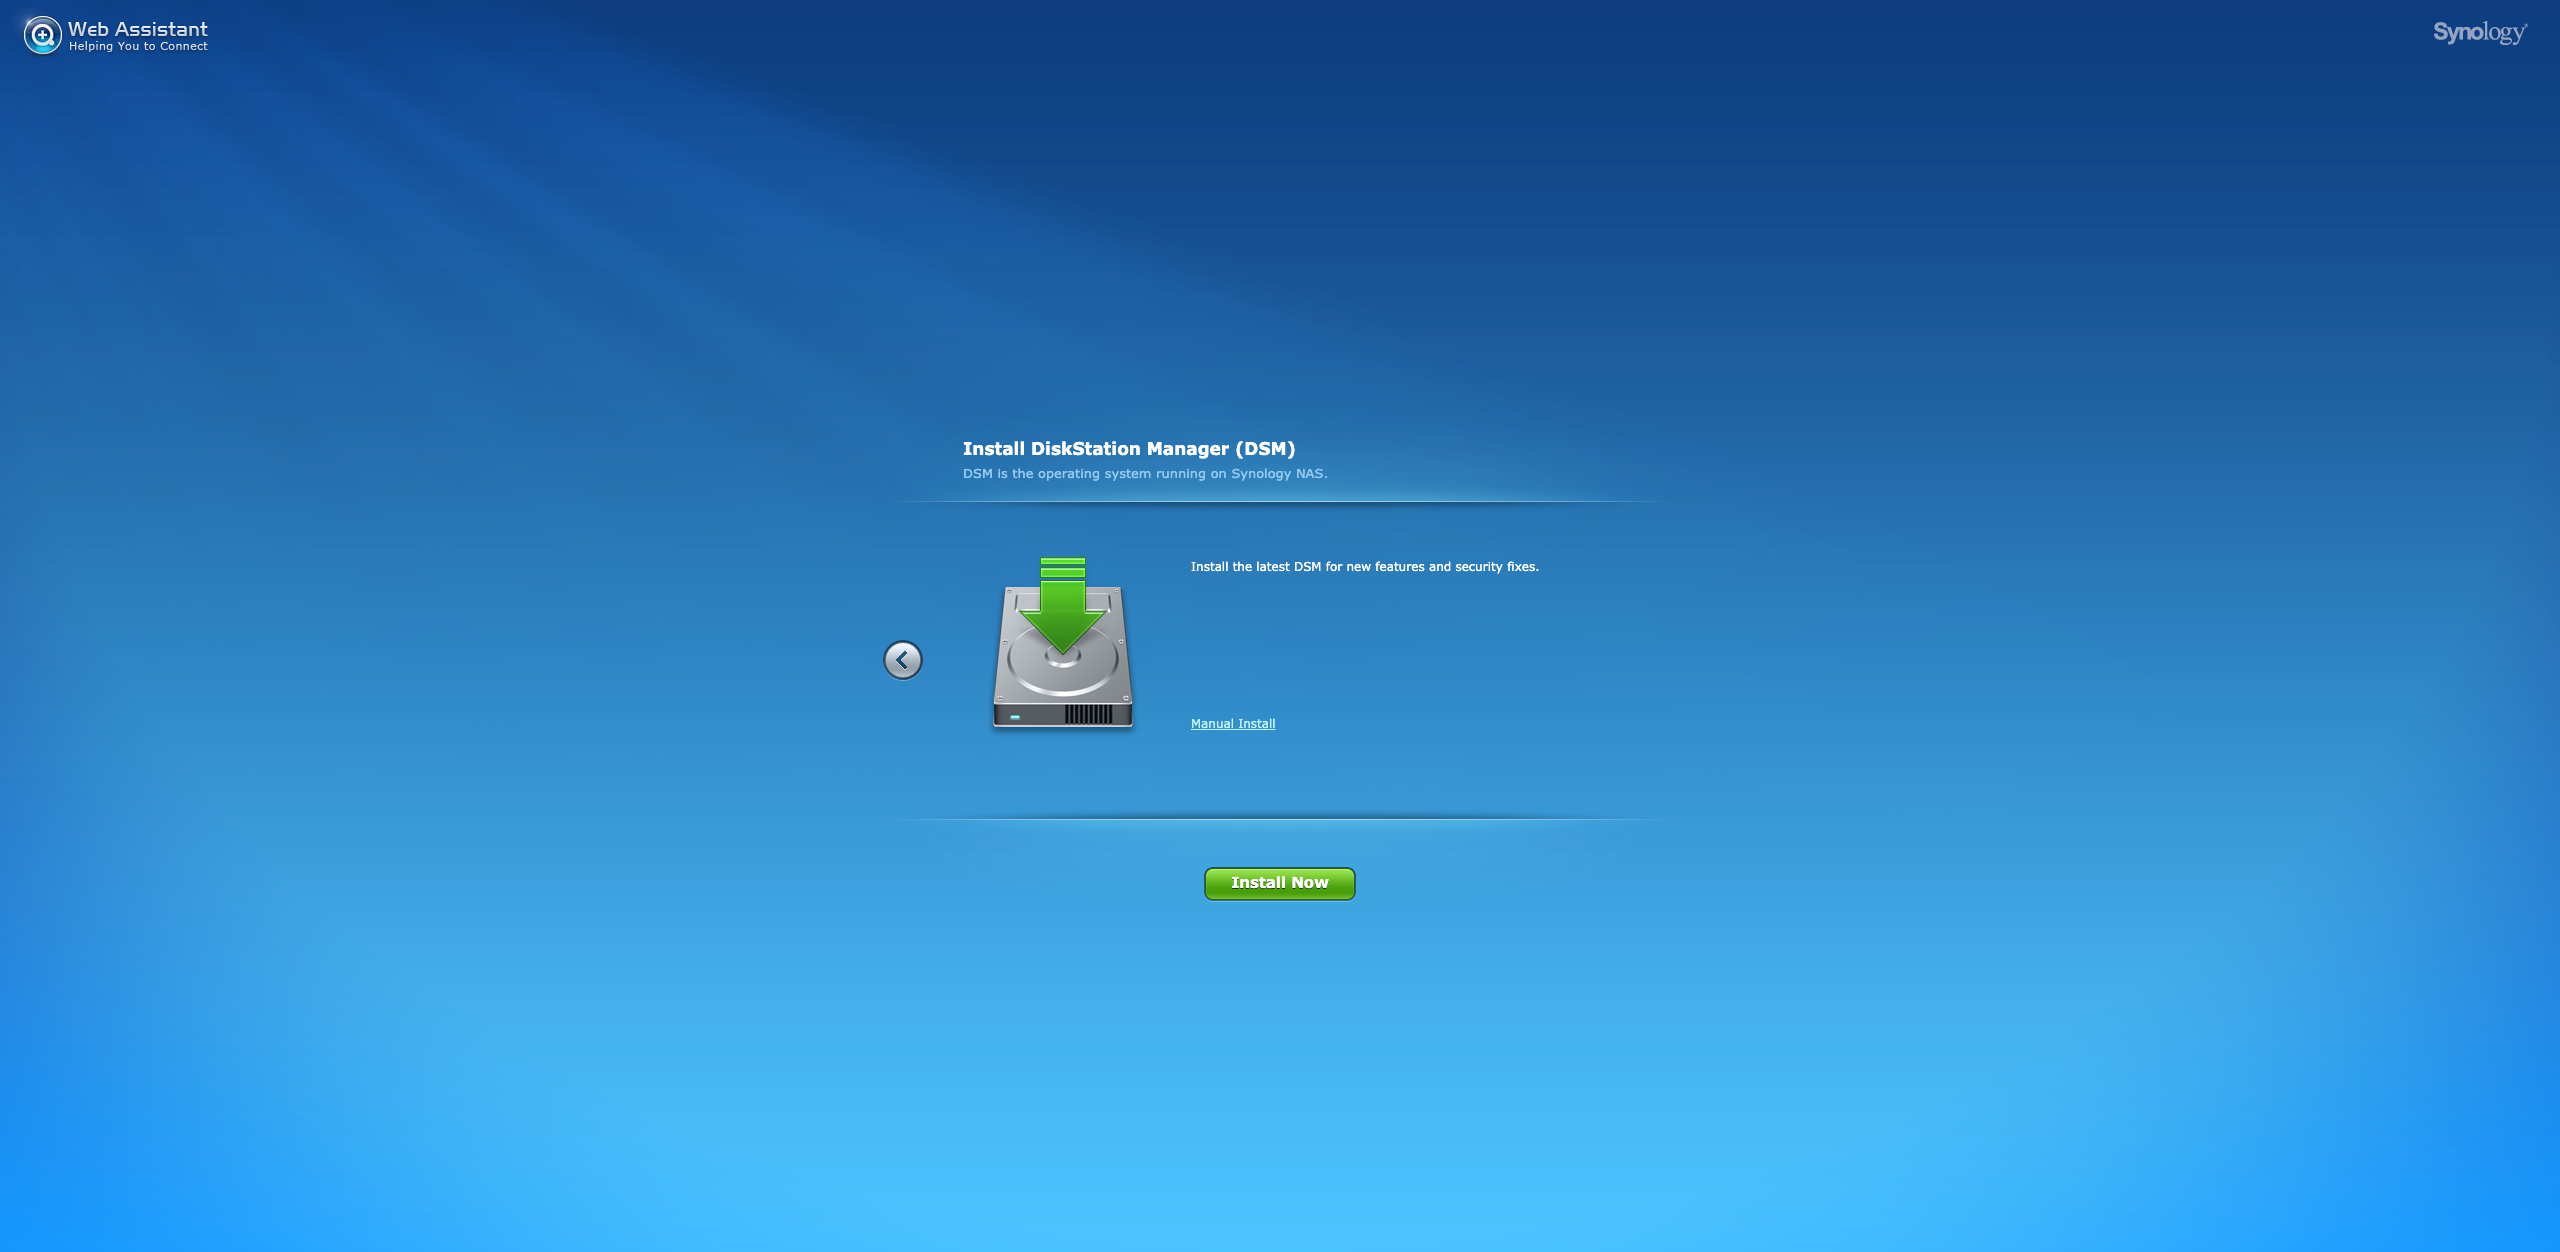
DSM is installed and it will bring you to set up your administrator account and Synology QuickConnect. QuickConnect is an optional setup.


Once that is done, you will be redirected to DSM’s main screen.

And now, you can proceed on to create a storage volume.

I chose Quick, SHR-2, and Btrfs.


And you are done! Now feel free to explore the wonderful world of DSM.
Conclusion
The price difference between DS920+ and DS1621+ is about S$500, S$752 vs. S$1,244. With this S$500, you get a better processor, better RAM (ECC), a PCIe slot, and two more drive bays. The only thing you potentially lose out on is the lack of an integrated GPU in the processor, which can help in transcoding media.
So if you are looking for a media NAS, I think it is better to use one with Intel processors like the DS920+ (4-bay) or DS1520+ (5-bay). Both are powered by Intel Celeron J4125 and comes with Intel UHD Graphics 600.
Other than that, I would say the DS1621+ will make an excellent work NAS for prosumers that allows you to use it as a NAS and act as a server using Docker Containers and Virtual Machines. You will have four Ethernet ports to play with for your Virtual Machines.
But of course, Synology can make it more value for money by throwing in an 8GB RAM stick instead of 4GB, using a 2.5GbE Ethernet port instead of just Gigabit.
The thing about upgrading NAS is you can never go back down to a less powerful one. It could be an expensive hobby if you considered this a hobby.
Hopefully, in the future, Synology can consider using AMD Ryzen V1605B with Radeon Vega 8 Graphics, so the next generation of the DS16/DS18 series can be used as a media streaming NAS, and I can upgrade my DS920+ to that.